SSL Certificate
First of all, your domain must be secured with an SSL certificate. To ensure this, visit your website by adding " https:// " at the beginning of the URL. For example, for aquaray.com, you will need to type https://aquaray.com. If you do not have an SSL certificate on your domain, you will get an error page like "Your connection is not private".
First of all, your domain must be secured with an SSL certificate. To ensure this, visit your website by adding " https:// " at the beginning of the URL. For example, for aquaray.com, you will need to type https://aquaray.com. If you do not have an SSL certificate on your domain, you will get an error page like "Your connection is not private".
Setting up an SSL certificate for shared hosting (Aqua Pro / Aqua One)
-
-
Step 2: Go to the section Your services => Domain names
-
Step 3: Select the desired domain name
-
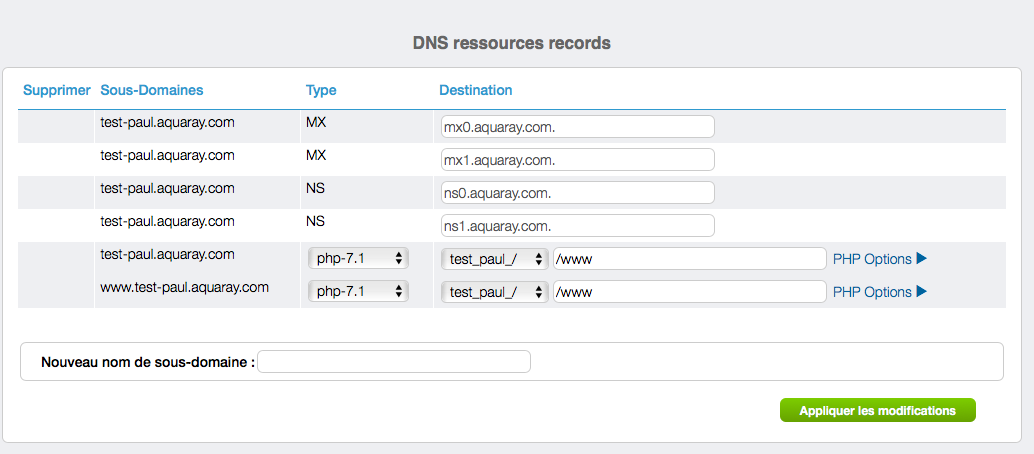
Step 4: DNS resources records section
-
In the type field select php-7.1 /php-7.3 for nomdedomaine.fr. www.nomdedomaine.fr. (Choice of the version according to the compatibility of the site) Important : be sure to choose a php version compatible with your site. To obtain this information, contact the person in charge of the Web development of your site.
-
Step 5: The certificate is generated within 15 minutes. Once in place, it is automatically renewed.
After installing an SSL/TLS certificate, traffic is not necessarily redirected to HTTPS. In that case, follow the step 6.
After installing an SSL/TLS certificate, traffic is not necessarily redirected to HTTPS. In that case, follow the step 6.
CMS configuration
If your site uses a CMS, you must configure it by updating the URL via the backoffice. If your site is "homemade", skip this step.
If your site uses a CMS, you must configure it by updating the URL via the backoffice. If your site is "homemade", skip this step.
-
Login to your WordPress backoffice via yourdomainname.ext/wp-login.php.
-
In your dashboard menu, go to Settings -> General.
-
Once on the general settings configuration page, simply update the fields named "WordPress web address" and "Site web address" (URL) by replacing the "HTTP" with "HTTPS".
-
Save the changes by clicking on the " Save Changes " button at the bottom of the General Settings page following these changes.
-
Login to the administration area of your shop.
-
Click System > Configuration from the menu, then select Web under General on the left. The Web settings are displayed.
-
Open the URL options tab and set the Automatic forwarding to base URL parameter to No.
-
Open the unsecured and secured sections and replace the http with https for each URL base.
-
Click Save Configuration.
-
Login to your PrestaShop backoffice via your administration link
-
In your dashboard menu, click on "Shop Parameters " and on " General ".
-
Sur la page " Général " , cliquez sur "Veuillez cliquer ici pour vérifier si votre magasin supporte le HTTPS ".
-
PrestaShop then asks you for a confirmation, click on the button named " I understand the risk ".
-
You then return to the "General" settings page.
-
On the "Enable SSL" option, click on YES.
-
Don't forget to save the configuration by clicking on the blue "Save" button at the bottom right of the "General" settings page.
HTTP to HTTPS forwarding
Once the configuration is done for sites using a CMS, you will need to configure the redirection from HTTP to HTTPS. To avoid duplicates, edit or create a .htaccess file at the root of your site using 301 redirection (permanent redirection).
Once the configuration is done for sites using a CMS, you will need to configure the redirection from HTTP to HTTPS. To avoid duplicates, edit or create a .htaccess file at the root of your site using 301 redirection (permanent redirection).
To do this, add the following code to your .htaccess file.
To do this, add the following code to your .htaccess file.
 RewriteEngine On

 RewriteCond %{HTTPS} off

 RewriteRule (.*) https://%{HTTP_HOST}%{REQUEST_URI} [R,L]
 RewriteEngine On

 RewriteCond %{HTTPS} off

 RewriteRule (.*) https://%{HTTP_HOST}%{REQUEST_URI} [R,L]
Warning: If you have several additional domains in your public_html, redirection will be a problem. It will redirect all traffic in HTTPS (even for uncertified domains!).
Warning: If you have several additional domains in your public_html, redirection will be a problem. It will redirect all traffic in HTTPS (even for uncertified domains!).
Perform the redirection while specifying the domain with this code:
Perform the redirection while specifying the domain with this code:
 RewriteEngine On

 RewriteCond %{HTTP_HOST} ^VotreDomaine\.com [NC]

 RewriteCond %{HTTPS} off

 RewriteRule ^(.*)$ https://%{HTTP_HOST}%{REQUEST_URI}
 RewriteEngine On

 RewriteCond %{HTTP_HOST} ^VotreDomaine\.com [NC]

 RewriteCond %{HTTPS} off

 RewriteRule ^(.*)$ https://%{HTTP_HOST}%{REQUEST_URI}
Padlock display
When your site is on HTTPS, some of your web pages may be left with elements that are not secure. In this case, your site does not show the appropriate sign (padlock on the left side of the URL) confirming that a site is completely secure using HTTPS.
When your site is on HTTPS, some of your web pages may be left with elements that are not secure. In this case, your site does not show the appropriate sign (padlock on the left side of the URL) confirming that a site is completely secure using HTTPS.
To find out which elements of your site are not secure and correct them, you can use the tool https://ssl-lookup.io/. By entering the URL of your site, you will get a list of these unsecured elements.
To find out which elements of your site are not secure and correct them, you can use the tool https://ssl-lookup.io/. By entering the URL of your site, you will get a list of these unsecured elements.


